


Description
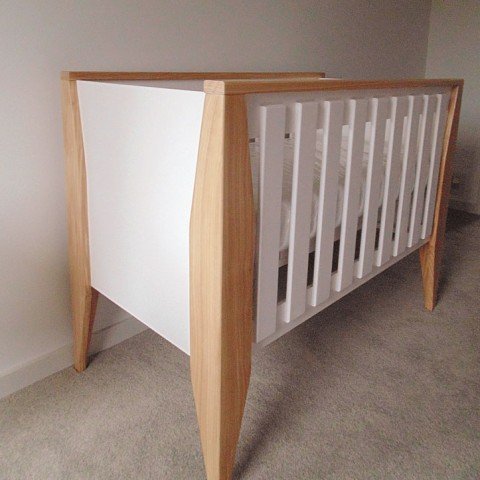
Cot Leon, realized by customers with our construction drawing
Click on the photos to see more and larger pictures of this furniture, and to read the experiences of our customers.


Furniture plan: make cot Leon yourself
Make the cot for your future (grand)child yourself! With our clear construction drawing, it cannot fail. And then you have a beautiful, original, light-footed and safe cot. Based on the working drawing, it is easy to make adjustments to make the bed completely to your own liking. The cot has an adjustable bed base and can be disassembled for storage or transport.
The design
We have of course tried to design an original and practical piece of furniture. With this cot we have taken a number of specific things into account:
In terms of design, the cot fits in with the children’s room ‘family’ Leon, consisting of chest of drawers, cupboard and cot. The style characteristics are mainly reflected in the construction and shape of the rejuvenated legs. (Incidentally, there is also an oval side table ‘Leon’ with the same rejuvenated legs.) We have ensured that the cot is demountable for storage or transport, and also that the bed base is adjustable (two positions).
We also always try to get the furniture efficiently from standard dimensions of sheet material. Ledikant Leon can, except for the bed base, be made entirely of mdf.
the details
We pay a lot of attention to keeping screw joints out of sight as much as possible. We also describe how you can make connections with dowels in some places, so that you do not need any screws at all. If you want to paint the furniture in an opaque color, it is sufficient to neatly conceal screw connections with the help of filler. Our furniture makers’ tips describe how to do this.
safe
We have also taken safety into account. The cot is super stable and meets the safety requirements regarding the distance between the bars and the height of the side walls compared to the bed base. To be fair, we have only recently adjusted the latter. You can therefore still see photos and images of ledikant Leon with less high side walls. Nicer, we think, but in the end we gave in to the generally applicable safety rules.
Can I do that?
Finally, the design is tailored to the possibilities and limitations of the DIY and his/her tools. If you have a handsaw (sometimes jigsaw) and drill and can handle it, you can make all our furniture, so to speak. The sawing of the panels can almost always be done by your wood supplier. If you want to do it yourself, we recommend using a circular saw.
… Customize
As you may have seen from the photos of made furniture, it is very easy to make changes to the dimensions and/or design yourself. The clear saw list and building drawings will automatically give you the confidence to do so.
The work drawings pack / the building drawing
The work drawings package consists of a nicely crafted brochure on A4 format. At the start you will find the list of necessities such as the wood (sheet material) and screws (size and number), glue and any other parts. It also shows what tools you need, and a cutting list with the sizes of the parts of the furniture to be cut.
Finally, in a roadmap, the manual for the assembly of the furniture follows, with clear drawings and clear explanations.
Tips
Each piece of furniture includes a number of appropriate furniture making tips on material selection, sawing, screwing, adhesives, sanding and lacquering, etc. When doweling is mentioned as an alternative, an explanation is also included, enough to get started with self-confidence.
Below you can see three pages from the furniture work drawing of cot León.


Hans –
Alles gelukt. De uitvoer is in essen afgewerkt met auro olie en was 2-in-1 nr. 129 en berkenmultiplex afgewerkt in zijdeglans wit. De vos is van de hand van de aanstaande opa.
De tekeningen waren zeker duidelijk genoeg om het geheel vanaf te maken. Met voldoende tips over hoe je iets zou kunnen doen.
Wat heb ik er aan tijd aan besteed? Bij elkaar een dag of zes verdeeld in meerdere stukjes en inclusief een pilsje tussendoor.
Jan vT –
Vorig jaar heb ik voor mijn kleinzoon een commode en een bedje Leon gemaakt van wit geschilderd MDF met blank gelakt Essenhout.
Ik had dat bedje verkleind naar een matrasmaat van 50 x 100 cm omdat ze kleinbehuisd waren en alle ruimte nodig hadden.
Inmiddels is mijn kleinzoon uit het bedje gegroeid en gaan ze verhuizen. Hij Krijgt nu een eigen kaner en daar hoort een nieuw bed bij. Nu met een matrasmaat van 70 x 140 cm.
Ik heb van het standaard ontwerp twee varianten gemaakt. Eentje met spijltjes voor de komende periode en eentje die hij over een jaartje kan gebruiken. De truc is dat alleen het voorfront ( met de spijltjes) verwisseld hoeft te worden en er is dan een peuterbed.
Egbert –
“Hierbij een foto van het bedje, waarin ons eerste kleinkind regelmatig slaapt.
Wij hebben je tekening wat aangepast, maar de basis blijft goed herkenbaar. Aanpassing was nodig vanwege afwijkende dikte van hout en vanuit wat ik zelf mooi en handig vond. Voor het hoofd-, voeteneind en de poten gebruikte ik planken, die ik 35 jaar gelden gebruikte als boekenplank.
Als ons kleinkind groter is, kunnen wij twee spijlen er uithalen, zodat hij zelf in en uit bed kan gaan maar dat zal nog even duren.”
Jan –
Het was een leuk werk en hoewel ik veel heb aangepast was ik blij met de werktekeningen. Ze waren helder en ik kon er goed mee vooruit.
De commode is nu ook klaar. Net als het bedje van wit gelakt MDF met Essen poten. Ipv 4 kleine laatjes nu 2 grote, vanwege de ruimtewinst.
De bovenrand is ook van Essenhout, met aan de zijkant dezelfde maten als de poten.
Ik hoop dat je het leuk vindt. Ik ben er in ieder geval best trots op.
Pieter –
Ik heb alvast veel plezier gehad bij het maken van dit bed.
Het is gemaakt uit multiplex beuk tijdens avondlessen die ik volg.
Ik gebruikte voor de verbindingen een domino van Festool.
Daardoor zijn er niet veel schroeven/vijzen te zien.
Rutger –
Hi Rob,
Ik was net klaar met de bouw en het verven van het ledikant in de basis kleuren toen mijn dochter op 9 oktober geboren werd. Op dezelfde avond nog een een potje roze verf gekocht om de laatste accenten te verven van de commode, kast en ledikant. Toegevoegd het resultaat….En om eerlijk te zijn mijn handen jeuken weer toen ik het tv-meubel met lift zag op je website. Maar nu eerst een boekenkast achter de bank….
Jan –
alles is goed gelukt. Ledikantje was ongeveer 6 uurtjes werk (inclusief freezen van alle kantjes), met de commode ben ik iets langer bezig geweest, ongeveer 1,5 dag. Daarna alles laten spuiten in dezelfde kleur van de box die we hier hebben gekocht.
Tekeningen en handleiding waren duidelijk, maar heb soms wel wat gewijzigd. Heb het ledikant demontabel gemaakt, en heb bij de commode bijna alles in verstek gemaakt, de poten, lades en de commode zelf ook. De achterplaat verzonken, en heb de kleine blokjes waar de meubels op staan achterwege gelaten.
Janneke –
Kinderkamer is helemaal klaar!
We hebben hier en daar wat aanpassingen gemaakt, zodat het helemaal naar onze wens was.
Het past allemaal heel mooi bij elkaar, de tekeningen hebben hier goed bij geholpen. We hebben al heel wat complimenten gekregen over de kamer, we zijn er erg blij mee!
I.B. –
Ik heb het bedje min of meer klaar…. de commode staat nog te drogen en de potjes moeten gedeeltelijk nog worden gemaakt.
Als ik zover ben dat alles helemaal netjes is zal ik je een aantal foto’s opsturen.
De handleidingen waren duidelijk.
Marlies –
Een prachtig resultaat. Van restjes heeft hij nog een rekje voor boven de commode gemaakt.
De aanstaande ouders zijn dolgelukkig met het perfecte resultaat.
Annet –
We hebben het ledikant inderdaad helemaal zelf gebouwd. Eerst alle materialen ( van MDF ) op maat gezaagd en mbv een bovenfrees alle randen waar nodig afgerond. Vervolgens het ledikant in vier delen opgebouwd en geschilderd. Ik heb wel een paar kleine dingen veranderd want zoals je kunt zien heb ik ervoor gekozen de achterkant van het ledikant hoger te maken. Dit om echt een voor en achterkant te maken. Zoals je kunt zien hebben we een versiering aangebracht op de voorkant van het bed. Dit vonden we zelf leuk.
De tekening en beschrijving waren voor mij duidelijk genoeg en goed te volgen.
Niels –
Het was leuk om hiermee bezig te zijn en ik heb een paar kleine aanpassingen gedaan, zodat de uitstraling iets robuuster is.
Ik ben erg tevreden met het resultaat
Gerrit –
De werktekening is aangekomen en ik heb de tekening inmiddels vluchtig bekeken en uitleg en toelichting zien er goed uit.
Ik ga er verder mee en zal je op de hoogte houden van mijn ervaringen en het eindresultaat.
Ik ga er plezier aan beleven.